
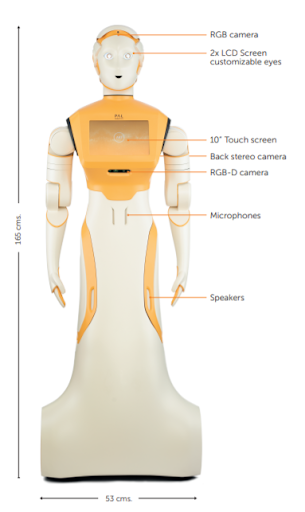
Introducing our humanoid social robot ARI
ARI, the social robot, arrives carefully packed up with everything you need to get started, including a Quick Start Guide, manual charger, and optional docking station.
ARI has a number of out-of-the-box functionalities some of which are ready to go almost straight away and ARI’s behaviour can be easily customized using the provided web interface. The robot can even be operated remotely using teleoperation – to enable users to see, interact and support customers in real time without physical interaction.
After unboxing ARI, get your new robot ready for use via the touch screen, with just a few simple steps. You can choose the language the robot will speak in, connect it to your network, and even name your robot. After taking some start-up steps, ARI is ready to help in your organisation – whether that’s in business, in retail, in a public space or at an event.
Here we give you a brief overview of some of the basic steps in getting started.
1. Presenting ARI: unboxing the robot
First of all, unlock the latch on the box, manoeuvre the case to a vertical position, unlock the remaining latches and open the front cover.
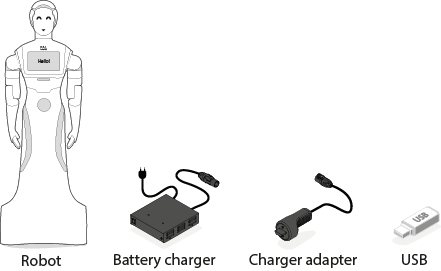
On opening the box, you will see that the robot is delivered together with the following items:
- Battery Charger and Charger Adapter
- USB flash drive with installation software
- Docking station (optional)
After removing the protective foam, carefully wheel ARI out of the box, using the lateral and rear handles. Taking a look at the Quick Start Guide is the first step to getting up and running. In ARI’s Quick Start Guide you’ll see some images together with instructions on how to proceed with the unboxing of the robot. Here is a summary:
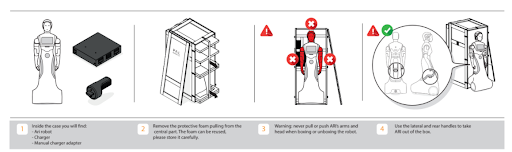
- Never pull or push ARI’s arms and head when boxing or unboxing the robot and use the lateral and rear handles to take ARI out of the box. Take care when wheeling ARI from inside the box to the floor, especially with the back wheels.
- Take into account the environment recommendations before switching ARI on, ARI is designed to operate in temperatures between 0ºC to 40ºC.
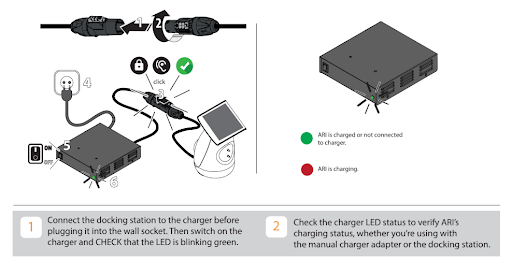
- Connect the manual charger adapter: to the charger before plugging it into the wall. Then switch on the charger and check that the LED is blinking GREEN.
- To charge the robot: plug the manual charger adapter to the connector on the lower rear part of ARI’s base.
- To switch ARI on: release the emergency button and open the lid to access the power buttons at the back of the robot, push the left button, it will turn RED. Then press the right button until it turns solid GREEN.
2. Hello ARI: first set up of the touchscreen
Say hello to ARI! When switching on ARI for the first time, through ARI’s touch screen you will be taken through a basic start up process.
The simple setup will guide you through options to choose the connection mode, enter network details, choose a robot name, choose the language the robot will speak in and add a Master PIN.

1. WiFi setup: During the setup process for the robot you will be asked to choose the WiFi connection mode, which can be either Access Point (AP) or Client Mode.
When the robot is set up as Access Point (AP) it provides its own network. You can then connect any WiFi-enabled device to the network (such as a laptop, tablet or phone). In the case of a device with mobile data capabilities being connected, it is necessary to ensure that those capabilities have been disabled to force the OS to use the WiFi network.
When the robot is set to Client Mode the robot connects to an external WiFi network. In this mode the robot may be able to access the internet (if the network is connected to the internet), and will be visible to any and all devices in the same network. Regardless of the chosen mode a network SSID and a password must be configured.
2. Master/Admin PIN: Select a Master PIN number for accessing ARI during the startup process. The Master PIN should be easy to remember and recorded somewhere else in case needed for future configuration.
3. Language selection: ARI is programmed to speak in multiple languages and here the languages installed on the robot will be shown as options to choose from.
4. Robot Name: Finally, you will be prompted to choose a name for the robot.
The touchscreen also contains a short video demo of ARI so you can see more.
3. ARI at the ready: charging the robot
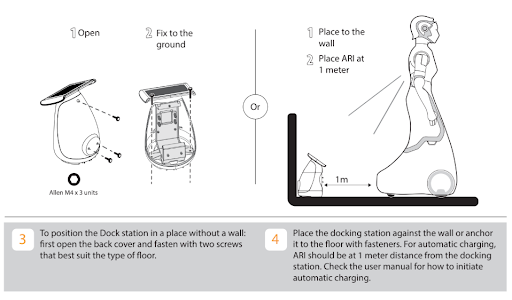
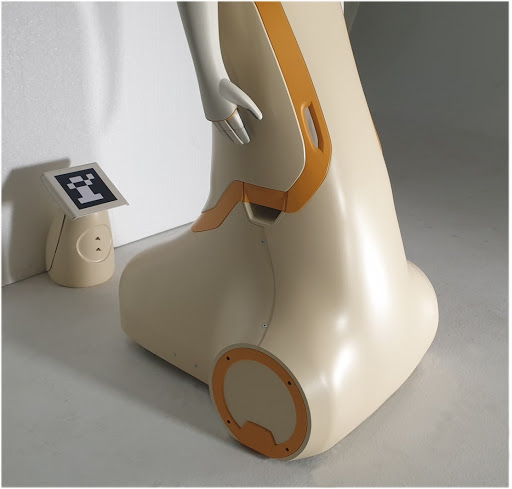
ARI can be charged manually, as described above, or by using the optional docking station. The docking station allows the robot to recharge itself automatically. To set up automatic charging for ARI, using the docking station, take the following steps:
- The docking station should be preferably mounted against a hard surface
- Place the docking station against the wall or anchor it to the floor with fasteners
- For automatic charging – ARI should be positioned within 1 metre of it.
4. ARI in detail: the documentation
The online User manual for ARI includes full details on ARI components and getting started with ARI as well as further information on navigation and ROS for the robot.
How to unbox ARI*
Disclaimer: In this video you can see how to go on unboxing ARI from a premium box.
Learning more about ARI
To find out more about PAL Robotics and ARI, visit our website and don’t hesitate to get in touch with our team visiting our contact page to ask more about how to use ARI, ARI’s capacity for Artificial Intelligence (AI) and how to tailor the platform to meet the needs of your business and customers.
From a Research & Development perspective, a comprehensive set of tutorials are also available for ARI on ARI Wiki ROS. These tutorials have been created for learning how to use ARI in the Gazebo simulation environment running on an Ubuntu computer.
If you find ARI as fascinating as we do, do not miss out our article on ARI helping in hospitals and our blog page with all our articles